 |
| South Arm and the Tasman Peninsula from the Zig Zag Track |
Showing posts with label Mount Wellington. Show all posts
Showing posts with label Mount Wellington. Show all posts
Sunday, 21 July 2013
From the Zig Zag Track
Yesterday was actually a really good day for climbing the mountain. The river and even Storm Bay were very calm, with lovely pastel hues. This is a three-shot panorama, and is massively detailed in its full size incarnation.


Friday, 25 January 2013
Lost World Circuit - 8th January 2013
With bushfires still burning on the Tasman Peninsula and elsewhere, something of a weather change was on the way. While overall it wasn't much, and didn't douse the fires, I think it was very welcome in minimising their further spread.
I was going to walk to Thark Ridge, but the wind was very strong at the top of the mountain, so I opted for a more comfortable circuit from The Chalet to Lost World, which includes a couple of segments of track I haven't been on before. Isaac had said he and a friend were going to down from the top (the normal access route), and I thought I might be able to meet up with them.
Hunters Track descends steeply below The Chalet, and comes to an intersection with the Old Hobartians Track. This essentially continues descending in the same direction, whereas hunters Track at that point zigzags back towards Junction Cabin. The Old Hobartians Track continues on downwards, stimulating weird thoughts like "what goes down must plod back up". Just after the track crosses the upper reaches of Newtown Rivulet, a marked track heads off to the left. The sign warns that the track is rough. This is the track which climbs steeply into Lost World. The climb is on boulders in patchy forest. The track is well marked with red and yellow paint marks, although Isaac tells me these can be hard to locate in deep snow. He and Michael had an "epic" climbing from here through Lost World in snow previously. The climb does go on for a while, and can be slow given the need for a little scrambling, but it suddenly emerges on the fallen columns below the cliffs of Lost World. The spot is marked with large cairn.
Lost World is worth a bit of exploring, and I previously provided some information here. Care is required amongst the boulders. To continue, the "track" basically heads right, straight across the "flatter" part of the area and finds a path around the cliffs on the right. The track to mount Arthur and the road at Big Bend then climbs steeply up alongside Lost World. The track emerges on the road, and a short walk down the road returns you to the starting point. All up, it's quite an enjoyable circuit, with some small challenges as you scramble up the boulders.
The day I was there recently it commenced to pour with rain as I arrived at Lost World. No sign of Isaac, so I called out. Sure enough, he rang me a minute later. They had retreated as the rain came down, making the rocks slippery. With only two seats in a ute, they didn't even wait to give me a ride down the road. Given the rain, I didn't pause to get the camera out, so I'll just provide this panorama acquired a few years ago, until I can get back there and get some up to date photos.
I was going to walk to Thark Ridge, but the wind was very strong at the top of the mountain, so I opted for a more comfortable circuit from The Chalet to Lost World, which includes a couple of segments of track I haven't been on before. Isaac had said he and a friend were going to down from the top (the normal access route), and I thought I might be able to meet up with them.
Hunters Track descends steeply below The Chalet, and comes to an intersection with the Old Hobartians Track. This essentially continues descending in the same direction, whereas hunters Track at that point zigzags back towards Junction Cabin. The Old Hobartians Track continues on downwards, stimulating weird thoughts like "what goes down must plod back up". Just after the track crosses the upper reaches of Newtown Rivulet, a marked track heads off to the left. The sign warns that the track is rough. This is the track which climbs steeply into Lost World. The climb is on boulders in patchy forest. The track is well marked with red and yellow paint marks, although Isaac tells me these can be hard to locate in deep snow. He and Michael had an "epic" climbing from here through Lost World in snow previously. The climb does go on for a while, and can be slow given the need for a little scrambling, but it suddenly emerges on the fallen columns below the cliffs of Lost World. The spot is marked with large cairn.
Lost World is worth a bit of exploring, and I previously provided some information here. Care is required amongst the boulders. To continue, the "track" basically heads right, straight across the "flatter" part of the area and finds a path around the cliffs on the right. The track to mount Arthur and the road at Big Bend then climbs steeply up alongside Lost World. The track emerges on the road, and a short walk down the road returns you to the starting point. All up, it's quite an enjoyable circuit, with some small challenges as you scramble up the boulders.
The day I was there recently it commenced to pour with rain as I arrived at Lost World. No sign of Isaac, so I called out. Sure enough, he rang me a minute later. They had retreated as the rain came down, making the rocks slippery. With only two seats in a ute, they didn't even wait to give me a ride down the road. Given the rain, I didn't pause to get the camera out, so I'll just provide this panorama acquired a few years ago, until I can get back there and get some up to date photos.
 |
| Lost World panorama, taken in Jan 2008. |
Wellington Falls from The Springs - 7th January 2013
I hadn't done this walk for a good few years. Probably the last time I did it, I carried Isaac on my back. (Editor: That would make it ~17-18 years ago!) I recall falling over somewhere at the top of the Potato Fields and Isaac's continuation along the 'track' without me was only retarded by Mr Macpac's clever restraints. I submit that Isaac is now too big for anyone to carry along anything, let alone the Wellington Falls track. There's a Hilux Ute that will back me up!
Anyway, I wanted to redo this walk, for inclusion in the upcoming set of iconic Wellington Walks. This walk around the south side of the mountain is pretty impressive, and ventures into the rougher and more remote parts of the Wellington Range. A note for the unwary - on cool or chilly days, the south side of the mountain can be very cold. This walk is rougher than many others on the mountain, and much of it crosses rocky tracks or boulder fields. However, it has good views, and the terrain feels more remote. That's because there are fewer people here, and fewer people walk here regularly. You do need to be self-sufficient. There is a low-level escape route if the weather cracks up on you too - although, your car may be left at The Springs.
If you want to make this a circuit walk, you can, but it is likely to become quite lengthy. Notes at the end will explain how to achieve a circuit.
The track climbs through the trees to a 4WD track. Turn left, and follow the Milles Track. This will shortly pass the Icehouse Track on the right. The track becomes more rocky, but is hard to lose, and undulates a little around the flanks of the mountain, providing good views to southeast and south in a few places. It descends to pass the left-hand turnoff to Snake Plains, then descends further to Disappearing Tarn, at the bottom of the boulder field known as The Potato Fields. I understand that there may occasionally be water in Disappearing Tarn, but I have never seen it. I have looked many times! The track then climbs across boulders on the Potato Fields, and into light forest where the track can be a little damp at times (Tasmanian/English understatement should be evident there.) On my recent visit it was in fact quite dry, but I think this is unusual. Then follows a descent through the forest to the well-made track that arrives at the top of the falls. There are good views of the top of the falls, which are no doubt impressive in times of high flow.
HOWEVER, let me tempt you into descending into the chasm. Below the large log that lies across the bottom of the viewing area, you can descend to the bottom of the falls. Beware: if you do so, you are absolutely relying on your own common sense and capability. There is an obvious track around the right hand end of the large fallen log. Below this, you will find at least two obvious ways to descend. It doesn't much matter which you take, as you will be end up squeezed between cliffs below and cliffs above. Be very careful, especially if you have anyone in your party who can't discern that the way ahead is too steep for their limited skills (eg. children, fools). There comes a point close to the bottom where you have to slide down a gravelly slope, under a fallen log and then scramble left over the same log to progress. You will emerge a short way below the bottom of the falls. Depending on water flow, you should be able to clamber upwards towards the base of the falls. You may be able to head downstream too, and the river may allow you to take a dip. In times of high flow, use your own judgment about what is viable.
The rocks here are obviously heavily weathered by high water flows. Have a good look at the cliffs and the channels the falls use - this was probably carved when there were vast amounts of ice and snow on the plateau above, but I haven't been here when flows are highest, and should do so to see what it looks like.
 |
| Smoke from the fires obscures the views from the Milles Track on the way to Wellington Falls - 7th January 2013 |
Anyway, I wanted to redo this walk, for inclusion in the upcoming set of iconic Wellington Walks. This walk around the south side of the mountain is pretty impressive, and ventures into the rougher and more remote parts of the Wellington Range. A note for the unwary - on cool or chilly days, the south side of the mountain can be very cold. This walk is rougher than many others on the mountain, and much of it crosses rocky tracks or boulder fields. However, it has good views, and the terrain feels more remote. That's because there are fewer people here, and fewer people walk here regularly. You do need to be self-sufficient. There is a low-level escape route if the weather cracks up on you too - although, your car may be left at The Springs.
If you want to make this a circuit walk, you can, but it is likely to become quite lengthy. Notes at the end will explain how to achieve a circuit.
Walk Description
The walk starts at The Springs. Drive to the upper carpark, along the one-way road that departs the main Pinnacle Road to the left at The Springs. There is plenty of parking here. Depart up the steps through the trees from the middle of the carpark. |
| The Potato Fields stretch away up the hill, as seen from near Disappearing Tarn - 7th January 2013 |
The track climbs through the trees to a 4WD track. Turn left, and follow the Milles Track. This will shortly pass the Icehouse Track on the right. The track becomes more rocky, but is hard to lose, and undulates a little around the flanks of the mountain, providing good views to southeast and south in a few places. It descends to pass the left-hand turnoff to Snake Plains, then descends further to Disappearing Tarn, at the bottom of the boulder field known as The Potato Fields. I understand that there may occasionally be water in Disappearing Tarn, but I have never seen it. I have looked many times! The track then climbs across boulders on the Potato Fields, and into light forest where the track can be a little damp at times (Tasmanian/English understatement should be evident there.) On my recent visit it was in fact quite dry, but I think this is unusual. Then follows a descent through the forest to the well-made track that arrives at the top of the falls. There are good views of the top of the falls, which are no doubt impressive in times of high flow.
 |
| The view of the top of Wellington Falls from the established lookout. |
HOWEVER, let me tempt you into descending into the chasm. Below the large log that lies across the bottom of the viewing area, you can descend to the bottom of the falls. Beware: if you do so, you are absolutely relying on your own common sense and capability. There is an obvious track around the right hand end of the large fallen log. Below this, you will find at least two obvious ways to descend. It doesn't much matter which you take, as you will be end up squeezed between cliffs below and cliffs above. Be very careful, especially if you have anyone in your party who can't discern that the way ahead is too steep for their limited skills (eg. children, fools). There comes a point close to the bottom where you have to slide down a gravelly slope, under a fallen log and then scramble left over the same log to progress. You will emerge a short way below the bottom of the falls. Depending on water flow, you should be able to clamber upwards towards the base of the falls. You may be able to head downstream too, and the river may allow you to take a dip. In times of high flow, use your own judgment about what is viable.
 |
| The falls from below |
 |
| Taken from directly below the falls, showing the cliffs. You won't be able to safely get to this point in times of high flow. |
The rocks here are obviously heavily weathered by high water flows. Have a good look at the cliffs and the channels the falls use - this was probably carved when there were vast amounts of ice and snow on the plateau above, but I haven't been here when flows are highest, and should do so to see what it looks like.
The alternative approach - and making a circuit
Wellington Falls is probably more usually approached along the Pipeline Track from Neika. Many people would use pushbikes to ride along the winding and relatively flat Pipeline Track, then leave their bikes at the end of the walking track that heads up and across the hill to arrive at the top of the falls from the opposite direction. The walking track is well made, and the use of bikes cuts the time required significantly. This alternative track can be used to make a circuit, so that you could for example start at Ferntree, climb to The Springs, walk to Wellington Falls and then return along the Pipeline Track. I did it once quite some years ago, and it makes for a lengthy walk. A circuit can also be achieved using the Snake Plains Track. |
| Vertical panorama looking down the gorge below Wellington Falls. |
Sunday, 6 January 2013
Mount Wellington - 21st December 2012
For Isaac's birthday, we took our German visitor Gabi up Mount Wellington, so he could at least say he'd walked up it. It was a cool day lower down, but on the summit the breeze was quite icy. We noted later that the apparent temperature was about -1°C, so the need for our jackets was unsurprising.
The wildflowers were very attractive.
The wildflowers were very attractive.
 |
| Cyathodes glauca, the Purple Cheeseberry, with both drupes and flowers - 21st December 2012 |
 |
| Leptecophylla juniperina subsp. parvifolia, Mountain Pinkberry (I'm uncertain about this identification, largely because this plant seems to have been reclassified at least once over time.) - 21st December 2012 |
 |
| Telopea truncata, Tasmanian Waratah - 21st December 2012 |
 |
| Eucalyptus coccifera, the Snow Gum or Snow Peppermint - 21st December 2012 |
 |
| Gaulthria hispida, Copperleaf Snowberry - 21st December 2012 |
 |
| Homo sapiens, Gabi Eyeselein - Having walked to the top of Mount Wellington - 21st December 2012 |
 |
| Niveoscincus microlepidotus, Metallic Skink(s), having a cuddle, Mount Wellington - 21st December 2012 |
Monday, 31 December 2012
The Mercury confirms Mt Wellington guidance is lacking

Saturday, 29 December 2012
Mount Wellington by Car

 |
| View of the Tasman Bridge from near the Mount Wellington summit. |
Despite its obvious natural appeal and popularity, there
are various suggestions about how it should be developed, with the most
prominent of these being the idea for a cable car. The view has been expressed
that we’re not “making the most” of it, and that visitors need “something to do”
when they get there.
To me the mountain seems to be quite popular without a need to enhance it artificially. I believe most tourists come here to see Tasmania rather than the same attractions they could see bigger and brighter elsewhere, and I’ve never been lost for something to do when presented with a view like that from the top of Mount Wellington. I think the mountain is probably a better tourist attraction without large-scale tourist infrastructure being built on it, but I do agree it needs a few low-key improvements to help tourists make the most of a visit.
To me the mountain seems to be quite popular without a need to enhance it artificially. I believe most tourists come here to see Tasmania rather than the same attractions they could see bigger and brighter elsewhere, and I’ve never been lost for something to do when presented with a view like that from the top of Mount Wellington. I think the mountain is probably a better tourist attraction without large-scale tourist infrastructure being built on it, but I do agree it needs a few low-key improvements to help tourists make the most of a visit.
If people really do return from their mountain visit
feeling that there wasn’t enough to do, then perhaps it is because they may not
be entirely clear where things are, where they can stop for a view or a picnic,
where they can take a walk that is within their capability. Some might not be
warned to take a jumper, coat, hat and gloves when it looks nice and sunny down
below. To some extent I think this is because there is a lack of signposting and
information. Hence, I decided to at least try to address this problem with
Mark’s guide to finding enough to “do” on the mountain to make a visit
worthwhile.
Really, there’s a whole mountain’s worth of stuff
available. You could easily spend several days on the mountain, as long as you
were happy to walk a lot. Anyone can find enough to enjoy a few hours in this
magnificent natural environment, unrivalled in proximity to any other Australian
city.
Mount Wellington Introduction
There are plenty of books about Mount Wellington, so I
won’t try to repeat everything they say, this is more of a “how to enjoy Mount
Wellington on its own terms” item. There are no shops on Mount Wellington, you
can’t buy anything up there, there are no “things” for the kids to do. Which is
good because you can’t spend any money up there.
 |
| South Arm and Tasman Peninsula from Sphinx Rock |
Fortunately there’s a road to the top, but it is narrow
and winding in places. It has steep drop-offs but good cable barriers. You will
want to drive carefully, and walkers and cyclists will thank you for it. Most
people drive up and down without incident. Overall, the drive is really a great
part of the experience. You may want to share the driving, as looking at the
view while driving is not recommended. Be prepared to stop to enjoy the
views.
There are various places to stop along the road, some
good, some not. I will try to note for you all the places where it may be worth
stopping, but some of the parking areas are tiny and/or dubious. Use your own
judgement, and make sure you actually park entirely off the road. Other vehicles
will need the whole width, as you will see. If you stop in the roadway, you may
cause a problem, even a hazard if you are stopped around a blind corner. If the
road is snowy or icy, it will have an extra level of difficulty. Many people
stay off it at such times, and you may find it is closed at some point. There
are signs to warn of this as you approach the mountain.
Using this guide
You might be someone with a couple of hours to spare,
who just wants to get out of the car a few times to look at the view, and walk
on fairly level ground in your normal shoes. Then again, you might have all day,
want to get out and see all the wild and rough tracks on the mountain, and be
happy to clamber up and down anything in all kinds of weather. You might also be
somewhere in between, and I’ll try to cater to all tastes. When there’s a walk
to do, I’ll try to let you know what you’re in for.
Longer walks will be added later, taking from 90 minutes
to half a day or longer. These will require a decent level of fitness and proper
clothing. Some experience in the bush is recommended.
I’ve put this info into a Google map as well, and you
can use either or both. I use Google Maps on Android to access the map while out
and about. If you want, just print out the pages from this document with the
drive description, or print the whole thing. Google Map at http://goo.gl/maps/Kg5rM
I also suggest that if you want to spend the whole day
or longer on the mountain, and especially if planning to do the longer walks, go
and buy the Mount Wellington Recreation Map. Sold wherever maps are sold, but
especially at Hobart Service Tasmania and the Hobart Map Shop. You might also
find that the Wildside Café at Ferntree has them.
Distances shown against items are from the intersection
of Huon Rd with Pillinger Drive, zero the tripmeter as you turn if you like, it
may not be necessary.
Drive description
From the city, get onto Davey St, get in the right hand
lane and continue straight ahead. The last set of traffic lights is where you
really need to go straight ahead. Make sure you don’t head left in the dual
lanes onto the Southern Outlet heading for Kingston. (If you do, don’t panic,
drive up the hill and turn off left to Mount Nelson then return down the hill
and turn left again, back onto Davey St.)
Having avoided driving towards Kingston, you now just
follow Davey St as it becomes the Huon Road and heads to Ferntree. There is a
sign some way up here which will warn you if any of the gates on the mountain
road are closed. If they are, usually for snow and ice, decide for yourself if
you want to proceed anyway. You can always park somewhere below the closed gate
and walk.
To head straight up the mountain, turn right up
Pillinger Drive in a sharp switchback corner which is well signposted. If your
vehicle can't make this tight turn, proceed along the Huon Road a short
distance, to the Ferntree Tavern carpark which specifically enables buses to
turn. (Optional) Instead of turning up there immediately, you can proceed a
little further along the Huon Road to the [1] CBD
of Ferntree before heading up the mountain where you will find:
[1a] The Fern Glade Carpark – This is the best place to park if walking from Ferntree. There are various walks from this point, including the main walk to the summit.
[1b] Wildside Café – Stock up here with lunch or snacks, or visit for a coffee and a feed afterwards. Open seven days, 8am to 7pm. They have indoor and outdoor seating, and a range of food and drink. It’s warm indoors. As at late October 2012, they had put some huge maps of Mt Wellington park on the walls, which would be very useful for intending walkers. See them here http://ferntree.tas.au/directory/fern-tree-general-store-and-cafe
[1c] Ferntree Tavern – A good spot for a feed and/or beverages afterwards. Larger vehicles use the carpark as a turning circle. Open 10am to late, 7 days a week. See them here http://www.ferntreetavern.com.au/ or phone on (03) 6239 1171.
[1d] Ferntree Park – Over the main road from the tavern, this is a good lunch spot. There's a playground for the kids, rudimentary toilets, a shelter with a fireplace, tables and chairs, and 3 wood-fired BBQs. Several walks also commence here, including the short walk to Silver Falls.
Silver Falls Short Walk – 30 mins return
ALONG 4WD TRACK THROUGH FOREST TO SMALL WATERFALL, EVEN SURFACE WITH MODERATE CLIMBING.
Park at the
Fern Glade parking area and walk around the road carefully to the entrance to
Ferntree Park. Alternatively, park in the short road running between the tavern
and the café if there is room. There is some space across the road from the bus
stop.
Enter the park
and turn left. The track is wide and easy, and after about ten minutes reaches
an intersection. Turn right and climb to Silver Falls. The water cascades down a
mudstone and sandstone cliff. The falls may have been higher in past years, as
the base may have been filled in after flooding. Retrace your steps to
Ferntree.
Along the track
there are various artefacts of Hobart’s water supply infrastructure, and it is
worth pausing to read the signs.
[2] At some point you will head up Pillinger Drive . Just above the intersection is a sign advising of road closures. Care is required driving amongst the houses which stretch a short way up the road.
[3] The Bracken Lane Carpark (0.8 km) – Driving beyond the end of the houses, this small parking area is on the right. Park here to walk to O’Gradys Falls. Don’t block the fire trail.
O’Gradys Falls Short Walk – 35 mins return
MAINLY ALONG 4WD TRACKS THROUGH FOREST TO WATERFALL, VIEWS OF MOUNTAIN, SOME CLIMBING, SOME UNEVEN SURFACES.
Park at the
Bracken lane carpark.
Head off down
the Bracken Lane Fire Trail. Bear left on the higher track at the fork reached
after about 5 minutes, where there is also a sign, and head onto the O’Gradys
Falls Track. This affords good views to the imposing Organ Pipes high above, and
ends at an intersection, beyond which the sign indicates continuation to the
falls slightly to the left on the Betts Vale Track. This narrower walking track
takes you shortly to O’Gradys Falls. Retrace your steps to the car. It is
unclear whether the falls are actually natural, or may have been modified to
improve the ‘cascade’.
[4] Radfords Track Carpark (1.25 km) – Continuing up the road, there’s a small parking area on the left where Radfords Track crosses the road.
[5] Woods Track Carpark (2
km) – A little further, there is a small carpark on the left hand side
just past Woods Track. You can walk carefully back down the road, and then
steeply uphill to find Rocky Whelans Cave.
 |
| Rocky Whelans Cave |
Rocky Whelans Cave Short Walk – 15 mins return
SHORT STEEP CLIMB ON UNEVEN SURFACES THROUGH FOREST TO SMALL CAVE/OVERHANG IN SANDSTONE CLIFF.
Park at the
Woods Track carpark.
Walk up the
steep Woods Track for about 150m. There is a narrow track marked for Rocky
Whelans Cave to the right heading up a bank. The cave is just a minute or so
along here, in a sandstone formation. It is not really clear whether Rocky
Whelan, a bushranger who was hanged for murder, ever used this cave. It would
provide some shelter in the rain, but it wouldn’t be too comfortable. Some
historians believe he probably used another cave closer to present-day
Kingston.
[6] Carpark for the Octopus Tree (2.6 km) – Further along, a medium-sized carpark is just below the hairpin. The walking track to the Octopus Tree leaves behind the barrier on the tight bend. This is the Shoobridge Track which also leads to various other locations on the eastern face of the mountain.
 |
| The Octopus Tree |
Octopus Tree Short Walk – 15 mins return
WALK THROUGH FOREST ON NARROW TRACK TO WHERE A HUGE EUCALYPT GROWS ON A BOULDER, SOME CLIMBING AND SOME UNEVEN SURFACES.
Park at the
Octopus Tree Carpark just below Shoobridge Bend.
Shoobridge
Track leaves on the outside of the hairpin bend – take care with the traffic
here. Walk along Shoobridge Track through the damp forest, taking the left fork
where the Circle Track departs to the right. The forest here has great fungi in
autumn. The Octopus Tree is signposted just to the right of the track. It is a
huge eucalypt which has grown on top of a large boulder, and its roots drape
around the boulder looking like a monster octopus. Shoobridge Track continues
and Sphinx Rock, the Lenah Valley Track and Junction cabin can be
accessed.
[7] Roadside Springs Lookout (4 km) – Driving about another 1.4km, you will find a low wall on the left on a tight bend, with space for a few cars to park. The view is available here for no effort whatsoever. If you’re OK to walk for a couple of minutes, I suggest driving a little further.
[8] Springs Lookout Carpark
(4.2 km) – Another 200m up the road, the carpark on the right allows
easy access to the main lookout, as well as being closest to the North-South
Cycle Track. Sometimes there’s space here when the main carpark is busy. I
recommend a walk to the lookout, which is signposted. You can walk from here to
the main Springs site a couple of minutes through the trees. Also, this is the
start of the North-South Track, a cycle track that descends to the Glenorchy
Mountain Bike Park.
[9] The Springs (4.3
km) – Driving another 100m you will find the main Springs carpark. I
still recommend walking back to the lookout. It can be busy here, and if there’s
no space, you can also park at the Upper Carpark as long as you’re OK to walk
back down the hill a short way. At this main Springs site there is a shelter hut
with fireplace, toilets, information signs, places to sit and eat lunch, a water
tap* and the start of several walking tracks. I recommend a walk to Sphinx Rock
for walkers. (*The water taps here and at The Chalet are untreated and fresh out
of the mountain streams. The Council have put big warning signs on them to cover
themselves in case you have a delicate constitution. I drink the water and I
think most local walkers do too, but then we might be immune to any bugs after
all these years.) The walk to Sphinx Rock commences from here along the Lenah
Valley Track.
 |
| The summit seen from Sphinx Rock |
Sphinx Rock Short Walk – 40-45 mins return
WALK ALONG WELL MADE TRACKS THROUGH ATTRACTIVE FOREST TO A VIEWPOINT ABOVE A SANDSTONE CLIFF, MINIMAL CLIMBING, EVEN SURFACES.
Park at The
Springs main carpark, or walk here from one of the others. The track leaves
behind the toilet block.
This is the
Lenah Valley Track, and will lead you all the way to Lenah Valley eventually.
Walk first gently uphill and then level and gently downhill through lovely
forest for 15-20 minutes. You will find a turnoff to the right. There is a steep
cliff here, so keep kids close. Access is through a kid-proof gate to minimise
the chance of accidents. Sphinx Rock is a small cliff (large enough to kill you)
in the sandstone underlying the dolerite which forms the upper part of the
mountain. There are good views from here, and there can often be views here when
there are few elsewhere on the mountain.
[10] Upper Springs Carpark and Springs Hotel site (4.6 km) – Drive up the one-way access road opposite the main carpark and have a look at the site of the old Springs Hotel. It’s worth getting out and doing some exploration around the grassy area. Great place for a hotel hey? Maybe, but the substantial hotel that was here was never very successful financially, and then burnt down. The view of the mountain is good from here, and it’s a quieter place to have lunch than the lower carpark. Some longer walks depart from this carpark up the set of steps to the right of the open hotel site. This is the main route up the mountain from The Springs.
[11] Climbers Carpark (6.9
km) – The road now heads along the front of the mountain. Some distance
up the road, you will detect that this small parking area is near when you see a
"turning traffic" sign. This carpark is useless for most of us. It is small and
pokey and has room for 5 cars if they’re parked strictly in accordance with the
diagram on the sign. However, it allows climbers quicker access to the Organ
Pipes up a very steep track. The rest of us have better ways to get to the Organ
Pipes, and may only want to use this carpark if it’s empty and we want to get a
photo from here. If so, look out for traffic, and there are better photo spots
anyway.
 |
| The Chalet |
 |
| The Organ Pipes |
Organ Pipes Short Walk – 45-60 mins return
WALK ON THE FACE OF THE MOUNTAIN TO ARRIVE BENEATH THE ORGAN PIPE CLIFFS, MODERATE CLIMBING, UNEVEN SURFACES INCLUDING BOULDERS.
Park at The
Chalet. The track leaves up the left hand side of the shelter.
Climb steeply
up the hill behind The Chalet, and cross the small creek where the track turns
left. Walk along here for 20 minutes or so, until you find yourself closely
beneath the Organ Pipes to your right. You can walk along further if you like,
or turn back when you’ve seen enough or used enough time. There are good views
from here. The track is bouldery in places, and can be damp underfoot at
times.
[13] Panorama Track Carpark (8.9 km) – Continuing above the Chalet, the road heads for a distance away from the summit and out onto Mount Arthur. Here you will find a small carpark on the right. Stop here to walk up the Panorama Track.
Panorama Track Short Walk – 50-60 mins return (but longer with variants described)
CLIMB THROUGH ALPINE FOREST WITH GREAT VIEWS, MODERATE AND STEEP CLIMBS MAINLY ON UNEVEN SURFACES.
Park in the
small carpark near the lower end of the Panorama Track. The track leaves about
50m up the road on the left.
Follow the
track as it winds upwards through button grass, boulders and snow gum forest to
rejoin the road about 1 km below the Pinnacle. This track is rough underfoot in
many places, and can be quite wet, muddy and slippery. The walk as noted then
just retraces your outward steps. However, you can continue walking once you
rejoin the road and walk to the Pinnacle if you wish, or walk back down the
road. If you walk down to Luckmans Hut (see below), it is possible to continue
down past Luckmans Hut and rejoin the Panorama Track, but the track is quite
indistinct. Please note that in poor visibility navigational skills may be
useful.
 |
| Hobart from the Blockstream carpark. |
[15] Lost World Carpark
(9.4 km) – Only a few hundred metres further the road turns sharply
back towards the summit, below Mount Arthur. There’s room for two or three cars
in a poor carpark inside the corner, depending on how well people park. However
getting out of the carpark afterwards can be tricky. You can also park at the
Blockstream Carpark below here, or the larger carpark above here and walk along
the road a little way. The Lost World Track starts on the outside of the tight
corner (see longer walks, coming soon). The track to Collins Bonnet starts on
the East-West Fire Trail a few metres above the corner (also see longer
walks).
 |
| The summit from above Big Bend |
[17] Luckmans Hut (or
Skating Rink) Carpark (10.5 km) – Another 500m up the hill from the
large carpark, several small and rough spaces for cars can be found on the left
hand side. Short walks to Luckmans Hut and the old skating rink can be made from
here.
Luckmans Hut (10 mins) and Skating Rink (5 mins) Short Walks
TWO VERY SHORT WALKS HIGH ON THE MOUNTAIN, OFF-TRACK AND ON MINOR PAD, SOME CLIMBING AND UNEVEN SURFACES.
Park in one of
the scrappy spaces on the left of the road.
Luckmans Hut is
below the road. Find a faint pad heading down the open alpine herb field.
Luckmans Hut is about five minutes down here. You can continue past the Hut and
rejoin the Panorama Track.The Skating Rink is on the other side of the road,
only about 75m from the corner. Head roughly southwards across the heath. It’s a
bit rough and wet in places. The skating rink is a quite obvious concrete
structure, built in the late 1930s. It is truly tiny, so was probably not used
for very spectacular skating.
[18] Upper Panorama Track Carpark (11.5 km) – Another kilometre up the hill, this tiny carpark is on the right, near the top of the Panorama Track which arrives at the road from the left. There are several very small parking spaces along the uphill-side of the road between here and the summit.
[19] Mount Wellington
Summit (12 km) – Finally you will arrive at the summit. There is a
one-way system which means you drive clockwise around the pinnacle to find the
carpark. A number of features here are worth visiting, apart from just sitting
anywhere you like and marvelling at the view. Some people have trouble with car
remote locking here. If so, there are instructions inside the visitor shelter
for solving the problem.
[19a] The Pinnacle itself – You should climb up here if you can, especially if you have walked to the top! On top is a “trig” point. The “point” is actually the metal point in the ground, and the pyramid structure above it enables people at distant locations to see it (with good optics). They were used for trigonometric surveying, and are largely useless in the GPS age. This one is most useful for holding onto as you climb to the top.
[19b] Visitor Shelter – Overlooks Hobart east of the carpark, and has interpretive panels inside along with a panoramic guide to what you can see. This latter is complete with errors however.
The Mount Wellington pinnacle

[19c] Summit Boardwalk – This runs down beside the visitor shelter. Great views can be had from here on clear days, and it is worth a walk for those who can.
The visitor shelter at the summit

[19d] Walk around the roadway – It is worth walking all around and seeing the views in all directions. Keen walkers will be able to spy walking destinations all over the place.
Hobart from the boardwalk

[19e] Westerly viewpoint – To the west of the carpark, this view looks out across the plateau. There is information here about the aboriginal history of the mountain. I think there is room to put in some information about what can be seen from here. I'm going to do an online panorama to name the mountains you can see.
[19f] Walkers’ Hut – You can see this on the right of the road below the pinnacle as you arrive. Rough shelter, but away from the crowds.
[19g] Walking Tracks – To the south of the carpark, beside the compound around the large concrete transmission tower a walking track heads away. This is the top of the Zig Zag Track, and it also leads to the track across the summit plateau to South Wellington.
[19h] Toilets – These are new in 2012 and quite nice.
 |
| View from part way down the ZigZag Track |
Zig Zag Track Short Walk – 10-60 minutes
A WELL-MADE TRACK TO START WITH, HAS GREAT VIEWS. SOON HEADS STEEPLY DOWNHILL BECOMING ROUGHER. WALK AS FAR AS YOU LIKE.
Having parked
at the summit, the Zig Zag Track heads southwards next to the enclosure around
the tall transmission tower.If you are going to do the Plateau Walk (next walk)
you'll probably leave this one, unless you particularly want to walk
everywhere.
The Zig Zag
Track takes you a little (or a long) way downhill on the front (east) face of
the mountain. Head along this track which gradually steepens and becomes
rougher. You can walk as far down here as you like, bearing in mind that unless
someone has gone down with the car, you're going to have to walk back up. (In
fact, you can walk all the way down to The Springs or Frentree from here if you
have someone to take the car down.) The vegetation is interesting, and the views
are quite spectacular, with the vista framed or bordered by the steep
mountainsides.
 |
| Dolerite tors on the summit plateau |
Summit Plateau Short Walk – 30-100 minutes
A ROUGHER WALK ON THE EXPOSED PLATEAU, TRACK MARKED BY SNOW POLES. SUPERB VIEWS AND LOVELY ALPINE ENVIRONMENT.WARNING: THIS WALK IS VERY EXPOSED TO POOR WEATHER, AND NAVIGATION CAN BECOME DIFFICULT IF CLOUD DESCENDS.
This walk also
departs alongside the transmission tower enclosure to the south.
This track is rough and in places poorly marked. In poor weather you can easily become lost. I strongly suggest you only undertake this walk on clear gentle days unless you know what you are doing. People DO become lost on this mountain. If the cloud comes down, you are going to find it very disorienting. This part of the mountain is extremely exposed in poor weather. If you walk far enough across the top of the mountain you actually come to the site of the Smith Monument. Dr Smith got lost when walking with friends and was never found again. Please also take warm and waterproof clothing and your mobile phone. Bear in mind that there are spots here where mobile phones don't actually work. A GPS with charged batteries will assist in retracing your steps if required.
This track is rough and in places poorly marked. In poor weather you can easily become lost. I strongly suggest you only undertake this walk on clear gentle days unless you know what you are doing. People DO become lost on this mountain. If the cloud comes down, you are going to find it very disorienting. This part of the mountain is extremely exposed in poor weather. If you walk far enough across the top of the mountain you actually come to the site of the Smith Monument. Dr Smith got lost when walking with friends and was never found again. Please also take warm and waterproof clothing and your mobile phone. Bear in mind that there are spots here where mobile phones don't actually work. A GPS with charged batteries will assist in retracing your steps if required.
The track to
South Wellington is marked about 200m along the Zig Zag Track, and heads
obliquely off to the right. There are poles all the way along this track,
although in places they are hard to find. Follow the track for as long as you
like. Eventually it descends quite a lot to South Wellington, but this is
described in the longer walks. The views are good from various points, and you
can turn left and head out to the steep edges to sit and look at the views
anytime you like. After about 45 minutes you will come to a sign pointing left
to the Rocking Stone. This spot provides good views, although the large perched
boulder no longer rocks, its plinth having moved in recent years. Take care to
retrace your steps accurately. There are views to south from along this track
that can't be obtained from the summit, and the plateau vegetation and boulders
are interesting and stark.
If you have limited time, can I suggest the following three walks as being the best to undertake.
-
Summit Plateau or Zig Zag Track
-
Organ Pipes
-
Sphinx Rock
Copyright © Mark G Hanna 2012. This work is licensed
under the Creative Commons Attribution-NonCommercial-NoDerivs 3.0 Australia (CC
BY-NC-ND 3.0) License. To view a copy of the license, visit http://creativecommons.org/licenses/by-nc-nd/3.0/au/
Basically, you should feel free to print the PDF
version for the use of yourself, your family, your friends and your guests
including guests in paid accommodation. You may not sell it to anyone, or
require any payment for it, and you may not alter it before distributing it.
Your use of the document should include attribution to me. The information is
available on the internet, and you can link to it. There should be no need to
reproduce it electronically.
Sunday, 4 November 2012
Driving Mount Wellington
Too many people have been claiming that there's "nothing to do" on Mount Wellington. Well, I beg to differ, and have written this guide to seeing Mount Wellington by car. I also thought that if I was going to say the mountain didn't need a cable car, then perhaps I should put my money where my mouth was and make sure visitors could actually access a guide to enjoying Mount Wellington without a cable car, restaurant, hotel, kiosk, bar or other entertainment.
It's available as a web page, and experimentally as a blog post with photos! Hopefully these are easy to use on smart phones.
Or as a PDF that you can freely print out.
Or in a Google Map.
Next steps include getting together some notes about the history and natural history of the mountain. I'd also like to make it into an App that automatically flipped from one location to the next as your smartphone sensed you nearing the various point of interest.
Constructive feedback welcome, make a comment or email me at mark.g.hanna@gmail.com
View Mount Wellington by Car in a larger map
Sunday, 1 April 2012
Mount Wellington - 3rd March 2012
Had a nice bit of exercise on a cloudy day up the front of Mount Wellington via the Zig-Zag Track. The Snow Berries are out and they are growing their bright red new foliage.
 |
| Snow Berry, Gaultheria hispida, Mount Wellington - 3rd March 2012 |
 |
| New foliage on Snow Berry, Gaultheria hispida, Mount Wellington - 3rd March 2012 |
 |
| View from the stone seats, Zig-Zag Track, Mount Wellington - 3rd March 2012 |
Sunday, 5 February 2012
Icehouse Track, Mount Wellington - 26th January 2012
 |
| Cloud about the Mount Wellington Summit - 26th January 2012 |
There was a cool breeze as we wandered across the plateau, and then down the ZigZag Track in short order. Isaac needed to be at an Australia Day party, so hanging around wasn't allowed.
 |
| Spreading Cheeseberry, Cyathodes straminea, Mount Wellington - 26th January 2012 |
Saturday, 21 January 2012
Mount Wellington - 14th January 2012
It was a cloudy day with a bit of drizzle about, but reasonably cool so not too bad for a climb up Mount Wellington. Walked to the pinnacle via the Zig Zag Track, and really enjoyed the exercise.
There were a group of people standing around on the track where it straightens out just below the big transmission tower. It became obvious they were watching something off across the hillside. I could see someone with a saxophone, and someone else with what looked like a piano-accordion. MoFo thing obviously. There were weird squeaky noises coming in snatches across the windswept hillside. Everyone was rugged up against the chilly breeze, straining to hear the "music". I decided the emperor really didn't have any clothes. Some of the people watching clearly didn't know what they'd got themselves in for. I was reminded of the old joke; What's the difference between a piano accordion and a trampoline? (Answer below) The group were revealed later in the MoFo program as West Head Project And Out Hear. When I returned, the audience had joined the players across the hillside, and the performance was winding up.
And the difference? You take your shoes off to jump on a trampoline.
 |
| Clarence and beyond from the ZigZag Track, Mount Wellington - 14th January 2012 |
There were a group of people standing around on the track where it straightens out just below the big transmission tower. It became obvious they were watching something off across the hillside. I could see someone with a saxophone, and someone else with what looked like a piano-accordion. MoFo thing obviously. There were weird squeaky noises coming in snatches across the windswept hillside. Everyone was rugged up against the chilly breeze, straining to hear the "music". I decided the emperor really didn't have any clothes. Some of the people watching clearly didn't know what they'd got themselves in for. I was reminded of the old joke; What's the difference between a piano accordion and a trampoline? (Answer below) The group were revealed later in the MoFo program as West Head Project And Out Hear. When I returned, the audience had joined the players across the hillside, and the performance was winding up.
 |
| Audience and players, West Head Project And Out Hear, Mount Wellington - 14th January 2012 |
Tuesday, 9 August 2011
Mount Wellington - 25th June 2011
Had a nice walk on Mount Wellington with Isaac. We walked up the Zig-Zag Track, then down the Panorama Track and back below the Organ Pipes. Isaac hadn't done all of the tracks before. The light on the river around Cadburys was quite interesting.
 |
| Derwent River from Mount Wellington - 25th June 2011 |
Sunday, 17 July 2011
Ridgeway Circuit - 25th May 2011
 |
| Sixpence Cave, Ridgeway - 25th May 2011 |
Trying to catch up on my blogs here. In the same vein as my last post, this walk is a short one, low down on Mount Wellington, and I'm going to include it in my Mount Wellington Walks. It's good in dubious weather, and OK for a bit of bush exercise in all but the worst weather, and there are some interesting things to look at.
The walk starts at the Ridgeway Reservoir carpark and takes in Sixpence Cave, Halls Saddle, the Pipeline Track and the Chimney Pot Hill summit. Overall it takes 1 1/2 to 2 hours if you spend a bit of time looking about as you go, but can be done in around an hour if walked briskly. The walk description I suggest is here, but feel free to get the Taroona 1:25,000 map and work out your own route.
Sunday, 10 July 2011
Ferntree and The Springs - 23rd May 2011
The week started off with some poor weather, rain and chilly winds. This was a good opportunity to try to piece together the best walk around Ferntree and The Springs to take in the various interesting and historic sights. This sort of walk can often be done when walks further up the mountain are likely to be uncomfortable or inadvisable due to the weather. I have provided a detailed description (PDF) of a walk that takes in O'Gradys Falls, the Octopus Tree, Sphinx Rock, The Springs, Rocky Whelans Cave, Silver Falls and other items of interest, and minimises backtracking and climbing hills twice. My current plan is to put up a website with about 15 to 20 Mount Wellington walks, including a few you can't find a guide to elsewhere. This will be one of them. Feel free to print out the PDF and take the walk if you wish. The Mount Wellington Recreation Map is strongly recommended for use with this walk, and others.
 |
| O'Gradys Falls, Mount Wellington - 23rd May 2011 |
Saturday, 9 July 2011
Collins Bonnet - 21st May 2011
The Saturday was a nice looking day, so I chose Collins Bonnet hoping for views into the valleys of both the Huon and Derwent, as well as some good views to the west. This walk is a good climb, and I was pleased to discover that recent weeks of much walking had greatly improved my fitness. Very nice walk from Myrtle Forest behind Collinsvale, with a chilly breeze on the summit. Only spoiling factor was the group of people on the summit who assumed that everyone else wanted to hear their attention-seeking, histrionic discussion of recent exploits. I must be getting old and crotchety.
For reference, Collins Bonnet and Trestle Mountain together are known as Sleeping Beauty in the Huon Valley. Collins Bonnet forms the hair, forehead, nose, long horsey upper lip, lower lip and weak chin, and Trestle Mountain forms the bosom. I understand the mountain has also been known as Boars back to people in the Derwent Valley.
For reference, Collins Bonnet and Trestle Mountain together are known as Sleeping Beauty in the Huon Valley. Collins Bonnet forms the hair, forehead, nose, long horsey upper lip, lower lip and weak chin, and Trestle Mountain forms the bosom. I understand the mountain has also been known as Boars back to people in the Derwent Valley.
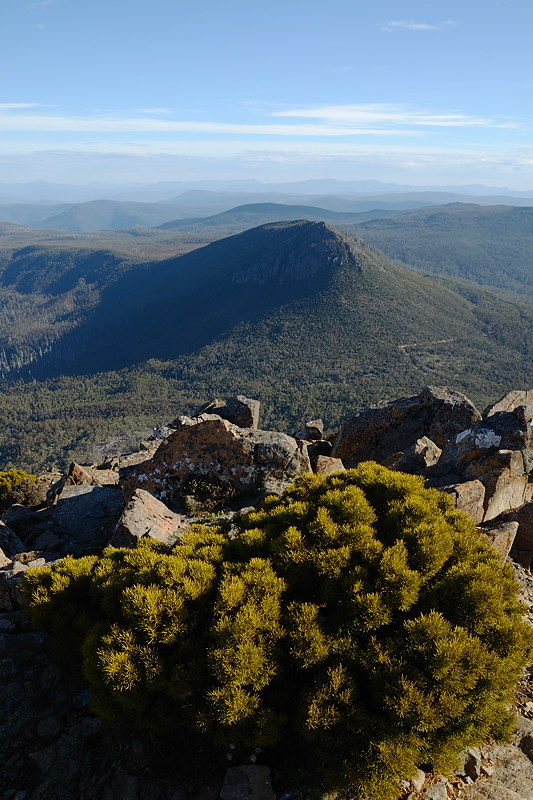 |
| Trestle Mountain from the summit of Collins Bonnet |
 |
| Trestle Mountain with Mount Weld and the Snowy Range in the distance. |
 |
| Sleeping Beauty's "nose", looking south from the summit (upper lip!) of Collins Bonnet |
 |
| New Norfolk seen from the summit of Collins Bonnet |
Subscribe to:
Posts (Atom)